Wednesday, 31 January 2018

cobbled surface - oops !

things don't always go smoothly with some projects, the embossed paper was nicely stuck down etc - then painted - a nice array of 'bubbles' turned up on it drying out - it would appear the paper is of marginally varying thickness and I in all likelihood I did not get the paper properly stuck down in places - so it dried unevenly leaving a bumpy surface
I have kept the leftover pieces, it may be better to use on smaller areas.

Sunday, 28 January 2018

cobbled surface (WIP)

During a recent wander round the local hobby emporium (Hobbycraft), I found some nice embossed paper sheet - pebbles. Looked good for use as a cobbled area, so bought two sheets. I covered a cork floor tile with some and tried it out for general look with some a couple of figures (one 28mm the other 40mm) and a building.
 I stuck an offcut onto a bit of spare card and tried out a paint scheme...
will work out how big a cobbled area I need, then cover some more cork floor tiles and paint the lot up.

Sunday, 21 January 2018

down at the farm....

I bought two boxes of Pegasus 1/48 farm animals a couple of weeks ago; very useful as backdrop items in games - also for raid scenarios. The animals have now all been finished off, so I set out a basic farm
 three new sheep to add to the flock (you get 2 in a box, but I lost one somewhere 😖..)
 oink - pigs painted as a piebald variety
 some goats ...
 chickens, small and tricky to do ...
 one of the small dogs in the set painted as a fox ....
 donkey and horse (horse was small toy one I had)...
 a little herd of dairy cows ....
I have a few animals left over from the two sets which I have put into my spares box.

Thursday, 18 January 2018

Harbourside (3) - a quick review

well I started off with this setup ...
I've made some wooden wharf sections, three buildings (crane, warehouse, merchants house) and adapted another building to make it more like a warehouse;  with other buildings and ships I have enough to setup most harbour areas for my 18th century games and story lines (some items may also appear on my other blogs as they are generic enough for a variety of periods).

Some piccies with some figures added with everything together ....


Saturday, 13 January 2018

Making a Merchants house....

The last of the buildings needed for a large harbour area - a basic merchants house...

A basic was structure made from foamboard, with a cardboard roof; the front and back of the building with shaped gables were cut from cardboard, and fixed on ....
I added a little wood filler to cover the side joins, once dry it was sanded and then the walls painted ....
For the roof I used printed paper tile sheet; windows and doors were culled from various images and printed out. Windows and doors were stuck onto the building as needed. Front and back views ...
 and of course on the waterfront ...

Thursday, 11 January 2018

Building a Warehouse ...

Pleased with the results of my build of the harbour crane (see previous post), I decided to use the same materials to make a warehouse. So I started by cutting out the sides and a base.
 parts were assembled to make the basic shell then roof, doors, trim etc were added
I used the same painting scheme for the wooden parts as per the crane, with printed paper sheets for the ground floor stone work and the roof tiles. Some pictures of the finished model, front and rear views ....
   

and in position on the wharf side....   


Monday, 8 January 2018

making a Harbour Crane ....

Very harbour needs a crane of some sort so I chose to make one based on the treadmill crane at Harwich:

the model would just be the crane and shortened building (with no detailed interior). First item made was the parts for the crane (made from chopsticks and other useful bits) ...
 I added the crane to the building base and checked for how it fitted in on the wharf ...
 the crane house sides and front were made of cardboard - scribed to represent planking ....
 the basic shell was assembled, plus a blank roof added with thin card; the building given undercoat of burnt umber; then I checked all the bits of the crane fitted together ....
 I then added the front awning/roof section using cardboard and the painted the building a faded brown; adding some printed tile effect paper sheet to the roof
I managed to find a view of the crane house side on and cropped the image to get the 'open frame' windows - overlaying a brown grid. This was then printed and cut to size and stuck onto the crane house model. Finally I assembled the crane, front and back views ....
  

 the crane on the wharf ....

Saturday, 6 January 2018

Harbourside (2) .....

New wharf sections have been completed, I made three 6 inch sections plus two 3 inch end pieces.  couple of possible uses shown below...

also finished painting the sailing barge ...
currently working on some extra buildings - a merchants house, a crane and a warehouse.

Wednesday, 3 January 2018

wooden wharf section (WIP)

been bashing together a prototype section of wooden wharf,
 used up some card, spare jenga blocks and some cut up bits of the wooden stick off a spent firework (picked up in the garden last November - looked like it would be useful 😀); the underside of the prototype section
will work out what I need and get building - the final deck surface of each will be scribed card

Tuesday, 2 January 2018

Harbourside ....

I got out my harbour stone wharf sections and set out a large harbour with suitable buildings.
 as you can see there are a few gaps on the wharf sides - so I'll be making up some suitable merchants warehouses and in addition a crane of sorts (maybe like the Harwich covered treadmill crane). A few other bits are needed - some extra wooden jetty sections plus some stone edging filler pieces for gaps.   One tricky thing will be to ensure I have buildings which can be used for a harbour or riverside wharf for both 28mm and 40mm; to provide a backdrop for story lines and also as game spaces.

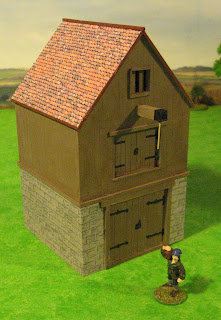
Initial job was to improve one of my existing buildings, to give a warehouse look, by adding some large doors to tone side and a hoist crane; the quicky conversion...
 painted up and on the wharf side ....

Monday, 1 January 2018

gaming table layout planner ....

I needed to do some table layout planning, to see how my table risers (various size sections approx 1" thick) could be used with a blue cloth to make basic arrangements for games with harbours or coasts.
Rather than get the bulky table risers out and shuffle them about I made some scaled down versions of them at 1in to the foot scale.

Scaled down versions of table riser pieces and the table surface ...
 a posible layout ....
 I'm going to make up some pieces to represent my large hill sections, then I can tryout setups of these with the table risers.